Author: Jenny
BLUEBERRY POMEGRANATE JELL-O SALAD


Blueberry Pomegranate Salad
2 cups water
2 packages (3 oz) raspberry Jell-0
1 package cream cheese softened (8 oz)
1 can crushed pineapple undrained (20 oz)
1 can blueberry pie filling (21 oz)
1 pomegranate (about 1 1/2 cup arils)
*3 1/2 cups heavy whipping cream (or 1 tub cool whip)
Optional- 1 cup celery diced
1/2 cup chopped walnuts or pecans
In a small pot, bring the two cups water to a boil. Put both packages of Jell-o in a large mixing bowl and add the boiling water and whisk till dissolved. Add the softened cream cheese and whisk until well combined (there may be tiny flecks of cream cheese left and that is okay). Add the pineapple, blueberry pie filling, (and celery and nuts if desired) and 1 cup of the pomegranate arils (reserving about 1/2 cup for topping) and stir until well combined. Refrigerate until the Jell-o is set (about 4-5 hours). Whip the whipping cream with a mixer until stiff peaks form. Fold into the Jell-o mixture. Transfer to a large serving bowl or a 9X13 pan, topping with remaining pomegranate seeds. Keep refrigerated until ready to serve.
*For a thicker salad use 1 1/2 cups whipping cream
WHITE BEAN CHICKEN CHILI
EASY APPLE DIP


Apple Dip
1 tub (16 oz) caramel dip (such as Litehouse brand Old Fashioned Caramel)
1 pkg (8 ounces) cream cheese softened (I use light)
1 package Heath bits (found in the baking aisle by the chocolate chips)
In a mixing bowl, stir together the softened cream cheese and the tub of caramel, reserving about 1/4 cup of the caramel to spread over the dip. Place in a serving bowl and spread the reserved caramel over the top. Sprinkle with the Heath bits (about 1/2 cup or more to your liking). Serve with sliced apples. Store leftovers in the refridgerator.
To keep apples from browning, slice and soak in a bowl with enough water to cover apples and with 1 tablespoon of lemon juice. Let apples soak for a few minutes then drain water, drying any excess water with a few paper towels.
For a cute gift, make dip as directed and then put in quarter pint (4 oz) jars. Put an apple on top, place in a cellophane bag, and tie with ribbon. Makes 4-5 jars.
DISNEY ELSA CAKE

COPYCAT ZUPAS CHICKEN ENCHILADA CHILI (SLOW COOKER RECIPE)


Chicken Enchilada Chili
1 can green enchilada sauce (28 oz)
1 can red enchilada sauce (19 oz)
1 can tomato sauce (8 oz)
1 can diced mild green chiles (4 oz)
1 can evaporated milk (12 oz)
1 can black beans rinsed & drained (15 oz)
1 can petite diced tomatoes (14.5 oz)
2 cups frozen corn or 1 can corn drained
1 chicken breast diced into 1 inch pieces*
1 tablespoon chili powder
1 teaspoon cumin
1 teaspoon garlic powder
Add all the ingredients to your slow cooker and stir until well combined. Cook on low for 6-8 hours or high 3-4 hours. Serve with sour cream, cheese and tortilla chips if desired.
*You can also add the chicken breast whole and shred after the soup is cooked
Recipe adapted from: Burnt Apple
PINNERS CONFERENCE 2015

These are just some of the presenters that will be there-
I am so excited for the food classes! You can check out a list of all the awesome classes HERE. The expo is free when you pre-register for your spot at http://www.pinnersconference.com and classes start at just $15!
I hope to see you there!
EASY VEGETABLE BEEF SOUP
Soup is one of my favorite meals to make and eat. I love making it because it’s all made in one pot so there isn’t a big mess to clean up. And I love eating it because it’s warm, comforting and filling.
I could make soup year round because I love it so much, but my husband thinks eating a steaming hot bowl of soup on a super hot summer day is just wrong 🙂
This vegetable beef soup is a favorite because I usually have all the ingredients on hand and it only takes about 30 minutes. Best of all its rich, hearty and delicious. If you are not a ground beef fan (like I know a few of my friends are) you can substitute ground turkey instead.
My kids gobble this soup up (veggies included!) especially when we serve some cheddar biscuits on the side. This makes a large pot, but I think the leftovers reheat nicely for a fast lunch the next day.
Easy Vegetable Beef Soup
1 pound ground beef
1 tablespoon vegetable oil
1/2 yellow onion diced
1 1/2 tsp garlic powder
2 tsp salt
1 tsp pepper
1 can beef broth (14.5 ounces)
1 can tomato soup (10 3/4 ounces)
1 can petite diced tomatoes (14.5 ounces)
1 cup water
2 Russet potatoes, peeled and diced into 1/2 inch cubes
2 cups frozen mixed vegetables*
In a large pot, saute the diced onion for 2-3 minutes over medium heat until translucent. Add the ground beef and brown until no pink remains. Drain any fat. Season meat with garlic powder, salt and pepper. Add the can of beef broth, tomato soup, and diced tomatoes. Bring to a boil and add potatoes and lower heat to maintain a simmer. Cook for about 15 minutes until potatoes are tender. Add the frozen mixed vegetables and cook for another five minutes until vegetables are cooked through. Taste and season with more salt and pepper if necessary. Also if broth seems to have cooked down too much add water, about 1/4 cup at a time until desired consistency.
*Some brands of frozen mixed vegetables have lima beans or some have green beans. We prefer the brands with green beans as my kids won’t touch lima beans. You can also substitute just frozen corn and peas if you don’t want all the vegetables.
RHODES MICROWAVE CINNAMON ROLLS
These cinnamon rolls would make a great after school treat for kids, or as some of the ladies at my party suggested, they would be great for Halloween trick or treaters with some hot chocolate. We enjoyed them as a breakfast treat, and everyone commented that it was pretty incredible that you could get a soft, warm cinnamon roll in such a short time. One person thought that microwaving the roll would make it tough but after she tried it she realized that wasn’t the case.
These cinnamon rolls are found in the freezer section of your grocery store (I got mine at Smith’s) along with other great Rhodes bread products. I would recommend keeping a bag of them in your freezer so you can have a quick cinnamon roll anytime the craving hits!
HAPPY FALL GIVEAWAY
My friend Kirsten at The Kusi Life, made this awesome little printable with the acrynom GLAD to help you as you are writing down thoughts in your journal. You will get this fun journal, two of her favorite doodle/writing pens, and this printable.
This adorable Cup Cozy from Elizabeth at Boton Purpura is perfect for all of your warm drinks in the chilly weather.
Also, from Elisa at The Kusi Life is this beautiful apron! I wish I had one just as pretty as this one!
This Cowl Button Scarf made by Meg from Sew Beyond Beautiful is made with a super soft brown and ivory plaid fleece and it will be sure to keep the cold air out and keep you warm on those windy Autumn days! If you are interested in purchasing your own, they are available in her Etsy Shop ?
Giveaway Tools randomly choose the winner the day the giveaway ends. We will announce it here and email you to let you know you have won. Good luck!
SHREDDED CHICKEN & RICE STUFFED PEPPERS (HALLOWEEN STYLE)

This post contains affiliate links. This means if you make a purchase through my links, I’ll receive a small portion of your purchase at no extra cost to you.
PERFECT PEACH PIE
1 recipe pie crust (below)
1 beaten egg
5 cups sliced peaches
1/2 cup flour
2 tablespoons lemon juice
1/2 cup white sugar
1/2 cup brown sugar
1/4 teaspoon nutmeg
1/3 teaspoon salt
- Preheat the oven to 450 degrees.
- Place one of the crusts into the bottom of a 9 inch pie pan. Brush the crust with some of the beaten egg to keep the dough from becoming soggy.
- Put the sliced peaches in a large bowl and gently mix them together with the lemon juice, flour, sugar, cinnamon, nutmeg and salt. Pour into the pie crust. Cover with the other pie crust (cut out shapes before covering if desired), and fold the edges under. Flute the edges to seal or press the edges with the tines of a fork dipped in egg. Brush the remaining egg over the top crust*. Cut several slits in the top. Bake for 10 minutes in the preheated oven, then reduce the heat to 350 degrees and bake for an additional 30 to 35 minutes, or until the crust is golden brown. If the edges brown to fast, cover them with strips of aluminum foil about halfway through baking. Cool before serving. Serve warm with vanilla ice cream!
* I don’t like a very brown crust so I actually don’t brush it with the egg. But it you prefer a darker crust then do use the egg
Recipe Source- Slightly adapted from All Recipes
Pie Crust Recipe
- In a large mixing bowl add the flour, sugar and salt and lightly whisk together.
- Use a pastry cutter to mix the shortening into the flour until the shortening is in small pea size pieces.
- Add vinegar to the cold milk, then add to the flour mixture all at once. Stir until just combined (don’t overmix).
- Put the dough onto a lightly floured surface. Split dough in half and set one aside. Roll out one half with a rolling pin, making sure to flip over after each roll. Roll into about 1/8-inch thick round. Roll onto the rolling pin and carefully place in pan.
- If you’re doing a one crust pie, trim edges with a knife and flute edges with hands. For a two crust pie- fill the pie, then roll out the other half of the pie dough. Slice or shape it then lay it on top the pie filling. Bake according to directions pertaining to pie filling.
COPYCAT SWIG SUGAR COOKIE (AKA THE BEST SUGAR COOKIES)
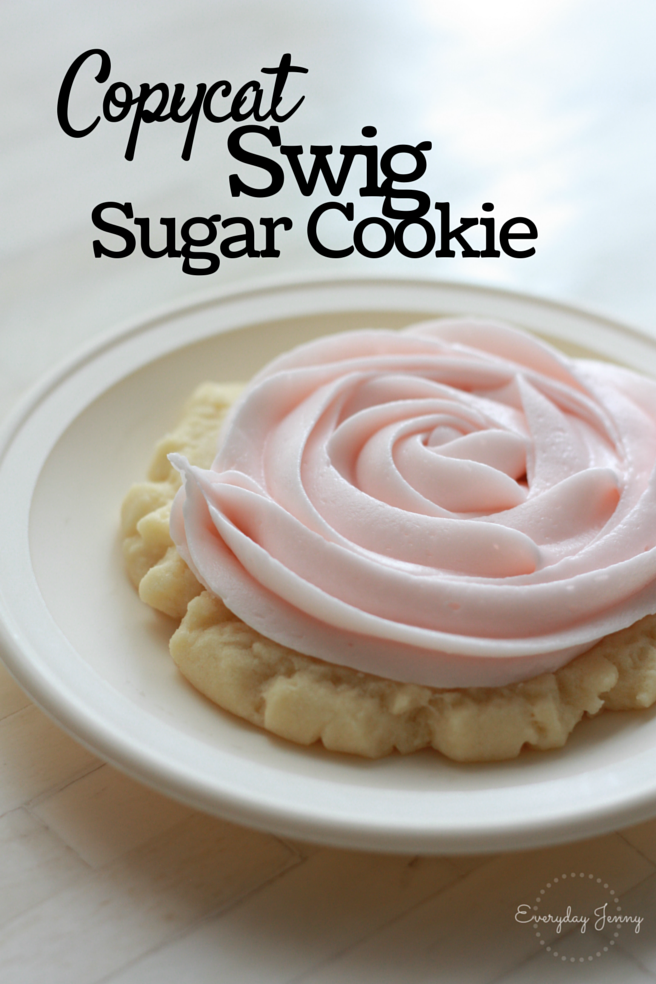
Some notes about the recipe. If you’ve never had a Swig sugar cookie, I think they are less sweet and have a thicker less fluffy texture (more shortbready) than regular sugar cookies. I mix my sugar cookies by hand, and the frosting in a stand mixer. It helps the dough not to get over mixed. I refrigerate my cookies after they have cooled, but I like to eat them at room temperature. The cookies are so moist that if you stack them in the refrigerator put parchment paper in between to keep them from sticking together. Also, these don’t work to roll out and cut shapes because the dough is so soft. One time I lessened the vegetable oil to 1/2 cup and I was able to roll out the dough between two pieces of parchment paper and cut out shapes.
This post contains affiliate links. This means, if you make a purchase through my links, I’ll receive a small portion of your purchase at no extra cost to you.
Sugar Cookies
1 cup butter softened
3/4 cup vegetable oil
2 cups sugar
2 eggs
1/4 cup light sour cream
1 tsp vanilla extract
1/2 tsp almond extract
1/2 tsp baking soda
1 tsp salt
5 1/2 cups flour
Preheat oven to 350. Cream together the softened butter, oil, and sugar. Add the eggs, sour cream, extracts and mix until well combined. Add the dry ingredients last and mix until a nice soft dough forms. (I like to knead the dough by hand to incorporate the last bit of flour.) Roll dough into golfball size balls and placed on a parchment lined cookie sheet. Using the back of a drinking glass sprayed with cooking spray, smash the balls into round circles about 1/2 inch thick. Bake for 8-10 minutes- cookies should not brown at all. Allow to cool on the cookie sheet for 5 minutes and transfer to a cooling rack if desired. Allowing them to cool on the cookie sheet is very important because they continue to cook. Don’t take them off too soon! I rotate two pans when I cook these so my first pan of cookies has the time to cool.
Frosting
1/2 cup butter softened
3/4 cup reduced fat sour cream*
2 pounds powder sugar
red food coloring (if desired)
Whip the butter in the bowl of the stand mixer on medium speed for a few minutes until light and fluffy. Add the sour cream and a few drops of red food coloring and mix for another minute, then gradually add the powdered sugar a cup at at time. You want the frosting to be nice and stiff, not runny. I usually add a few cups of sugar, check the consistency and taste and then add more if needed. You might not use the whole 2 pounds of powdered sugar. Frost the cooled cookies. I like using the Wilton 1M tip for rosettes.
*I use the reduced fat because it’s not as thick as regular sour cream
PARTY SHERBET
SLOW COOKER CHILE VERDE
Don’t let the number of ingredients in this recipe fool you- this meal is probably one of my favorite slow cooker meals. We love to eat it over rice, but it is great served burrito style too.
Slow Cooker Chile Verde
1 jar (16 oz) La Victoria thick ‘n chunky salsa verde (other brands would work, but this is my favorite)
1 pork roast 2 pounds
1 tsp cumin
1 tsp garlic salt
1/2 tsp pepper
1 can pinto beans rinsed and drained
Place your pork roast in the bottom of the slow cooker and sprinkle the dry seasonings over it. Dump the entire jar of salsa over the roast, adding a little water if necessary to the jar to get all of it out. Cook on low for 6-8 hours or high for 3-5 hours. Roast should pull apart easily when it’s done. Shred the pork and put back in the salsa and juices. Add the pinto beans to the crockpot for the last half hour of cooking. Serve over rice and top with cheese, sour cream, and cilantro, or serve in tortillas.
WHIPPED CREAM FROSTING

This recipe is super easy to make, and the best part is you can change up the flavor depending on the type of Jell-O you choose. I love making a strawberry cake and making the cheesecake version of the whipped frosting. It’s so good! I always get rave reviews whenever someone tries this frosting!
I also love that I can easily pipe designs with it. Buttercream can sometimes be hard to squeeze out of the icing bag, but not only is this easy to decorate with, it holds up beautifully. Rosettes are one my favorite easy designs to use for a cake.
I used the Wilton 1M Tip for the rosettes on this 6 inch cake.
This post contains affiliate links. This means, if you make a purchase through my links, I’ll receive a small portion of your purchase at no extra cost to you.
One batch of this frosting is perfect to fill and frost a 6 inch cake.
See other cakes I frosted with this whipped cream frosting—> HERE and HERE
YARD SALE SATURDAY JUNE 13 & JUNE 20

I picked up a few things there. These cute little adidas shoes for $1 for the little one and some new shovel sets for 50 cents each. There were actually a bunch of the shovel sets and I was trying to figure out a good idea of what to do with them all. They probably could have made a cute party favor if I had any kids with summer birthdays.
I also bought these little hobnail candle holders in the picture below for $3 and sold them a few days later for $15. The 5’X3′ chevron rug was only $8 and the lady said she had just bought it and it didn’t work at her place. I also picked up some super cute name brand clothes (mostly Baby Gap, Hurley, Carters) for 50 cents a piece. I had more than what’s pictured but I’ve decided it’s kind of hard to take a picture of lots of clothes. Some of the clothes were fall clothes that were a size bigger and I even got a storage container for 50 cents to store them in. A lot of times people will sell their storage containers if you ask about them and they are handy to store your new items in.
I went to a yard sale where they really wanted to get rid of their stuff so they were making deals left and right and giving away a lot of their stuff for free. Sometimes you’ll find that people really don’t want to stay out longer (especially if it’s hot!) so they are ready to make deals if you just take their stuff. I got the shop vacuum for free, along with the squirt gun and cute boy shoes. I bought the movies for $2 a piece and sold 8 of them because I had duplicates and knew that the Disney movies would go for more.
These are some other things I spotted but didn’t buy. These cute gold polka dot and striped mugs were 10 cents apiece. I actually regret not buying them because they probably could have been a cute gift with some hot chocolate. This little vintage kids hutch was $20. One yard sale had a bunch of random new toys for $1 and I also spotted a duck browsing through the yard sales. I wonder if he found anything? Also, not from a yard sale but I saw these sweet toys on the side of the road with a big free sign. Love that!
Did you go out yard sale-ing this past weekend? Find any good deals?
SUPER CHEESY LASAGNA
Lasagna
1 pound ground beef or turkey
1 jar of your favorite pasta sauce (I like the can of Hunt’s traditional spaghetti sauce, 26 oz)
1 pkg lasagna noodles (16 oz)
1 tsp garlic powder
Salt & Pepper to taste
1 container ricotta cheese (15 oz)
1 pkg cream cheese (8 oz) softened
1 cup cottage cheese
2 cups mozzarella cheese
1/2 cup parmesan cheese
Dried parsley flakes
Cook your noodles according to package directions. Drain and lay out the noodles flat on a paper towel (this helps to keep them from sticking together). Brown the ground beef or turkey in a large pan, adding the garlic powder and salt and pepper to taste. Drain any fat. Add pasta sauce plus a little water (I usually add about 1/4 cup) and bring to a simmer, remove from heat.
In a large mixing bowl, mix the ricotta cheese, softened cream cheese and cottage cheese until smooth. Spray a 9X13 pan with a very light coating of cooking spray to prevent sticking. Put a layer of noodles in the bottom of the pan, then a layer of meat sauce (1/3 of the meat sauce) and 1/2 of the cream cheese mixture. Sprinkle with mozzarella cheese and parmesan. Then layer noodles, 1/3 of the meat sauce and the other 1/2 of the cream cheese mixture, sprinkling again with mozzarella and parmesan. Layer one last time with noodles, and the last of the meat sauce and cover with the remaining mozzarella and parmesan cheese. Sprinkle with parsley flakes and cover with aluminum foil.
If baking immediately cook in a 350 oven for 30 minutes total, 15 with the aluminum foil on and uncovered for the last 15 minutes.
Or you can refrigerate the entire pan to bake later, and then bake for 1 hour total, 45 minutes covered and 15 uncovered. Enjoy!
RED, WHITE & BLUE GIVEAWAY

YARD SALE SATURDAY JUNE 6
One of the best yard sale tips I have is to start early in the morning (I know I hate that too, I like to sleep in but with two early risers in my home that doesn’t happen much anymore.) I look online the night before and take pictures on my phone of the ads of the yard sales I want to check out. I also check the addresses on google maps so I have an idea of which ones are closest and where I want to go to first and in which order. After you have been yard-saling for a while you will get to know your area better and which areas typically don’t have the best yard sales. For example I have gone to yard sales in retirement communities and there’s nothing I really need there. I find better deals in areas with more families because I am looking for more kids items.
Here are a couple of my finds this week. Two gumball machines and a another water dispenser. It’s kind of funny that I bought one last week because I haven’t seen them before. This one was also $1 and I liked the beehive shape. The gumball machines were $5 and $3. I bought them because I knew right away I could flip them. I sold them the same day for $40.

Now comes the next question I’m sure you have, how do you know what you can flip?
Here’s my advice. Stick with what you know. I flip a lot children’s/baby items, because I have kids right now and so I know their price range. So when I see kid’s items and know they are a good deal I will buy them and resell them. I also follow quite a few yard sale sites on Facebook and as I browse I will take mental notes of what items are selling for so when I see things at yard sales I know if they are good to flip. In the case of the bubble gum machines I had seen those sell fast before and ironically about 20 minutes before I posted mine someone sold another one in a few minutes.
Some other things I saw, some cool old vintage windows that were $20, another Ikea shelf, a bench and a cute little tikes car.
You must be logged in to post a comment.